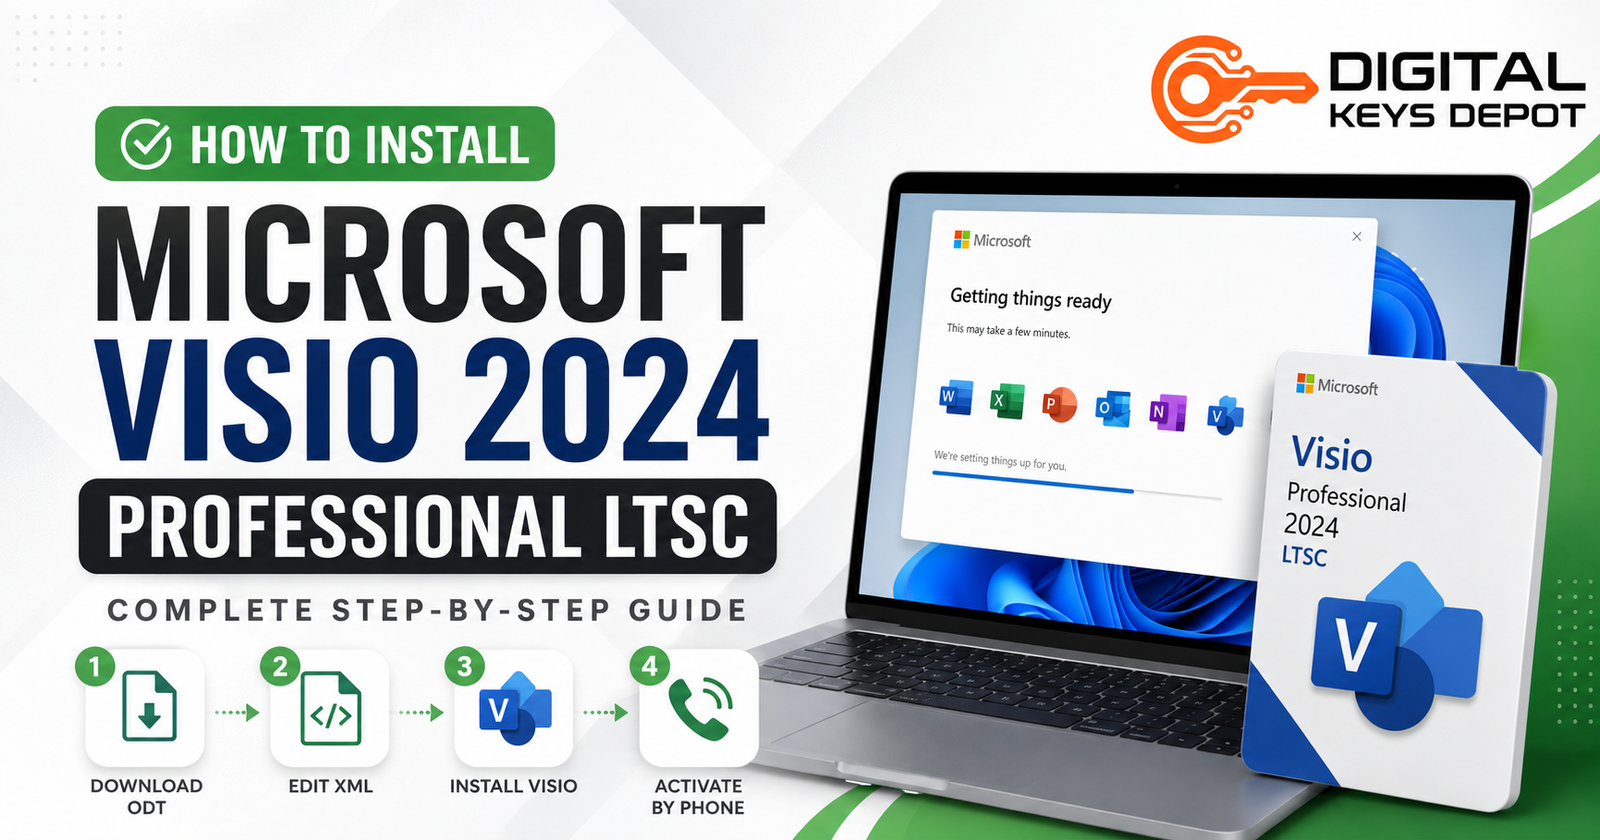
How to Install Microsoft Visio Professional 2024 LTSC
Microsoft Visio Professional 2024 LTSC is a Windows-based diagramming application designed for users who need professional tools to create flowcharts, network diagrams, organization charts, process maps, floor plans, technical diagrams, and business documentation.
Unlike many older installer formats, Visio Professional 2024 LTSC can be installed using the Office Deployment Tool, also known as ODT. This method gives you a clean and controlled installation process by using a setup folder, a configuration.xml file, and a simple Command Prompt command.
In this guide, we will show you how to install Microsoft Visio Professional 2024 LTSC on a Windows PC using the Office Deployment Tool and the correct configuration.xml file for Visio Professional 2024 Volume.
Before you start, make sure you already have a valid Microsoft Visio Professional 2024 LTSC product key. You will need to replace the sample key in the configuration file with your own product key.
Visit Digital Keys Depot to buy Microsoft Visio Product Keys and other Microsoft software product keys.
Before You Begin
Before installing Microsoft Visio Professional 2024 LTSC, please prepare the following:
- A Windows PC
- A stable internet connection
- Your Microsoft Visio Professional 2024 LTSC product key
- Administrator access on your computer
- The Office Deployment Tool from Microsoft
- Enough free storage space for the installation files
- A clean setup folder on your C: drive
This guide is for Windows PC only. It is not intended for Mac, Chromebook, iPhone, iPad, Android devices, or Visio for the web.
Important Compatibility Notice
Microsoft Visio Professional 2024 LTSC should be installed with the correct product configuration. If you use the wrong Product ID, wrong channel, wrong edition, or wrong product key, the installation may fail or the wrong product may be installed.
For this guide, the configuration file uses:
- OfficeClientEdition: 64-bit
- Channel: PerpetualVL2024
- Product ID: VisioPro2024Volume
- Language: en-us
- Product key placeholder: XXXXX-XXXXX-XXXXX-XXXXX-XXXXX
Replace the placeholder product key with your actual Visio Professional 2024 LTSC product key before running the installation command.
Step 1: Uninstall Previous Office or Visio Versions
Before installing Microsoft Visio Professional 2024 LTSC, it is recommended to remove older or conflicting Office and Visio installations from your PC.
This can help prevent installation errors, activation conflicts, and mixed-version issues.
To uninstall older versions:
- Open the Windows Start menu.
- Go to Settings.
- Open Apps.
- Look for older Microsoft Office or Microsoft Visio installations.
- Select the program you want to remove.
- Click Uninstall.
- Restart your PC if required.
If you already have another Office or Visio installation on your PC, make sure it is compatible with Visio Professional 2024 LTSC before continuing.
Step 2: Download the Office Deployment Tool
Next, download the official Office Deployment Tool from Microsoft.
You can search for “Office Deployment Tool Microsoft Download” or visit the official Microsoft download page for the Office Deployment Tool.
After downloading the file, keep it in your Downloads folder for now. You will extract it into a setup folder in the next steps.
Step 3: Create a Setup Folder
Open File Explorer and create a new folder on your C: drive.
Use this folder name:
C:\Office2024SetupThis folder will store the Office Deployment Tool files and your configuration.xml file.
Your setup folder path should look like this:
C:\Office2024SetupUsing a simple folder path is recommended because it makes the Command Prompt steps easier and helps avoid path errors.
Step 4: Create the Configuration File
Now you need to create a configuration.xml file for Microsoft Visio Professional 2024 LTSC.
This file tells the Office Deployment Tool which product to install, which channel to use, which edition to install, which language to use, and which product key should be applied.
Follow these steps:
- Open Notepad.
- Copy the configuration below.
- Replace XXXXX-XXXXX-XXXXX-XXXXX-XXXXX with your own Visio Professional 2024 LTSC product key.
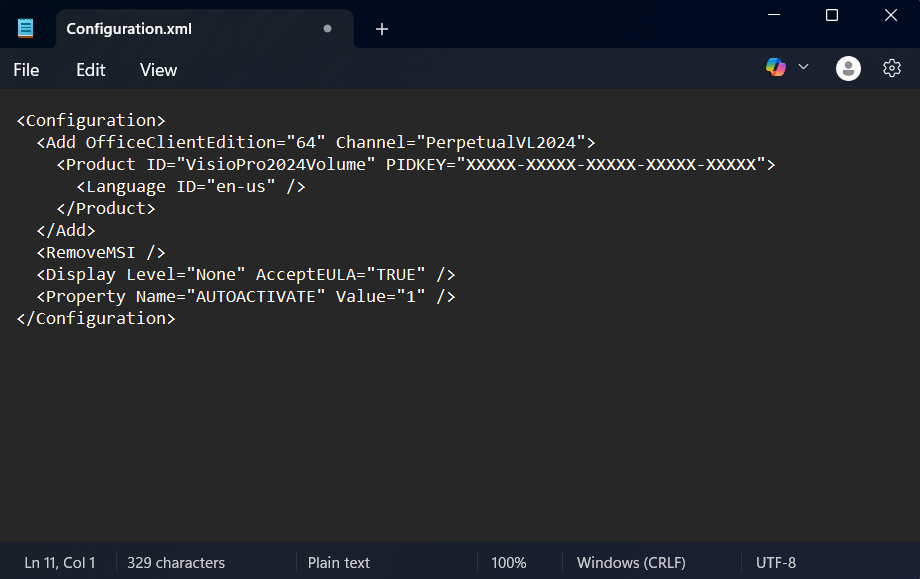
Use this configuration:
<Configuration>
  <Add OfficeClientEdition="64" Channel="PerpetualVL2024">
    <Product ID="VisioPro2024Volume" PIDKEY="XXXXX-XXXXX-XXXXX-XXXXX-XXXXX">
      <Language ID="en-us" />
    </Product>
  </Add>
  <RemoveMSI />
  <Display Level="None" AcceptEULA="TRUE" />
  <Property Name="AUTOACTIVATE" Value="1" />
</Configuration>
Important: Do not leave the sample XXXXX product key in the file. Replace it with your actual product key before installing.
👉 If you need a Visio Professional 2024 LTSC product key, you can buy it from us here.
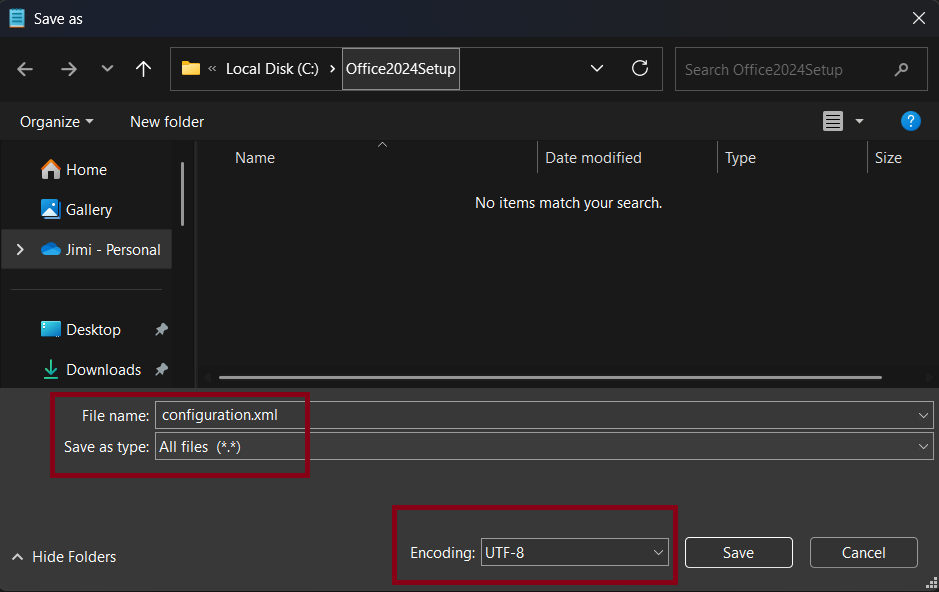
- Save the file as configuration.xml inside the C:\Office2024Setup folder:
Go to File -> Save As.
Make sure to select the following options and save in the folder C:\Office2024Setup:- File name: configuration.xml
- Save as type: All Files
- Encoding: UTF-8
Step 5: Extract the Office Deployment Tool
Now extract the Office Deployment Tool into the setup folder.
Follow these steps:
- Run the Office Deployment Tool file you downloaded at step 2 before.
- If Windows asks for permission, click Yes.
- Accept the Microsoft Software License Terms.
- When asked where to extract the files, choose:
C:\Office2024Setup- Click OK or Continue.
- Wait until the extraction is complete.
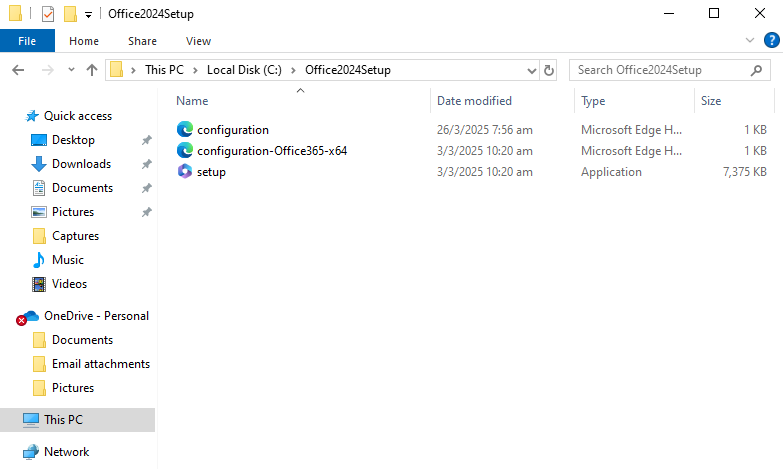
After extraction, the folder should contain setup.exe and other files from the Office Deployment Tool.
Step 6: Verify Your Setup Folder
Before running the installation command, open this folder:
C:\Office2024Setup
Your folder should include:
- setup.exe
- configuration.xml
- Other Office Deployment Tool files
If setup.exe is missing, the Office Deployment Tool was not extracted correctly.
If configuration.xml is missing, create it again using Notepad and save it inside the correct folder.
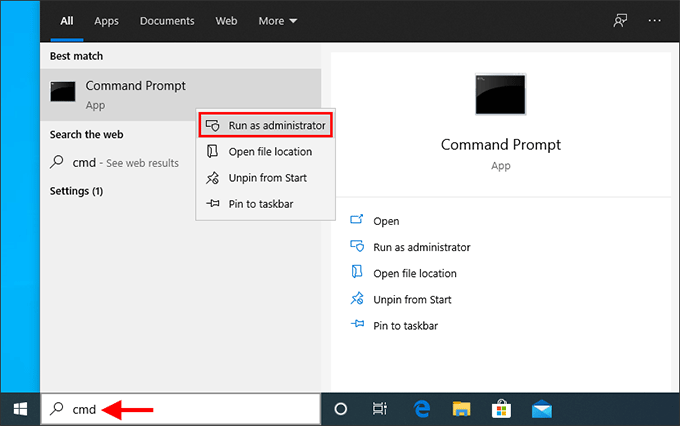
Step 7: Open Command Prompt as Administrator
Now you need to open Command Prompt with administrator permission.
Follow these steps:
- Click the Windows Start button.
- Type CMD.
- Right-click Command Prompt.
- Select Run as administrator.
- If Windows asks for permission, click Yes.
Administrator permission is important because the installation process needs system-level access to install Visio Professional 2024 LTSC.
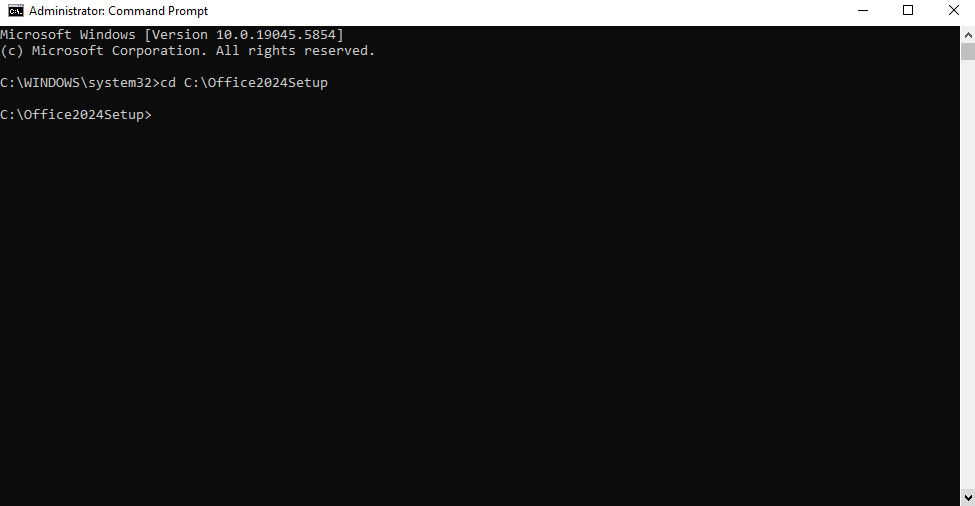
Step 8: Navigate to the Setup Folder
In the Command Prompt window, type the following command and press Enter:
cd C:\Office2024SetupAfter pressing Enter, the command line should move into the setup folder.
You should see something similar to:
C:\Office2024Setup>If you see an error, check that the folder name is correct and that the folder exists on your C: drive.
Step 9: Start the Visio Professional 2024 LTSC Installation
To begin the installation, type this command and press Enter:
setup.exe /configure configuration.xmlThe Office Deployment Tool will now read your configuration.xml file and start installing Microsoft Visio Professional 2024 LTSC.
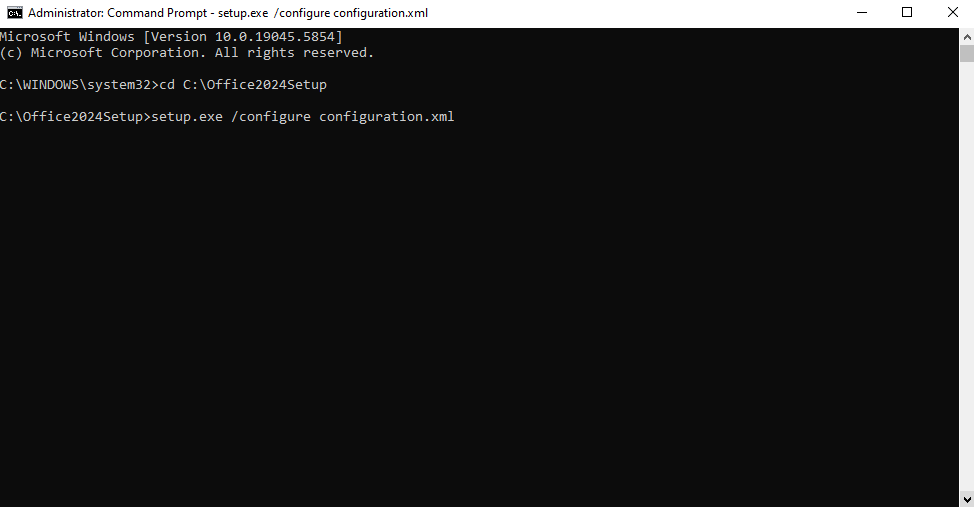
Important Installation Notes
During installation, you may not see a normal installer window.
This is because the configuration file uses:
<Display Level="None" AcceptEULA="TRUE" />That means the installation may run silently in the background.
Please wait until the Command Prompt returns to:
C:\Office2024Setup>Do not close the Command Prompt while the installation is running.
Do not restart or shut down your PC during installation.
Step 10: Open Microsoft Visio Professional 2024 LTSC
After installation is complete, open the Windows Start menu and search for:
Visio
Then open Microsoft Visio Professional 2024 LTSC.
If the installation was successful, Visio should appear in your Start menu.
Step 11: Activate Visio Professional 2024 LTSC
The final step is activation.
Follow this guide to activate Visio Professional 2024 LTSC.
Troubleshooting: Visio Does Not Appear After Installation
If Visio does not appear in your Start menu after installation, try these steps:
- Restart your PC.
- Search again for Visio from the Start menu.
- Check whether the installation command has finished.
- Make sure setup.exe and configuration.xml are in the same folder.
- Make sure the configuration file uses Product ID=”VisioPro2024Volume”.
- Run Command Prompt as administrator again.
- Run the installation command again.
If the problem continues, check whether an older Office or Visio installation is causing a conflict.
Troubleshooting: configuration.xml Opens as a Text File
If your configuration file opens as a text file or does not work during installation, the file may have been saved as:
configuration.xml.txt
To fix it:
- Open the C:\Office2024Setup folder.
- Enable file name extensions in File Explorer.
- Rename the file to configuration.xml.
- Make sure the file extension is .xml, not .txt.
- Run the installation command again.
Troubleshooting: Product Key Error
If you receive a product key error, check the following:
- Make sure the product key was typed correctly.
- Make sure there are no extra spaces before or after the key.
- Make sure the key matches Microsoft Visio Professional 2024 LTSC.
- Make sure the configuration file uses the correct Product ID.
- Make sure you did not use a key for a different product, such as Office, Project, Visio Standard, or another Visio version.
The product key in the configuration file should replace the placeholder:
XXXXX-XXXXX-XXXXX-XXXXX-XXXXX
Troubleshooting: Installation Runs Silently
If nothing seems to happen after running the command, this may be normal.
Because the configuration file uses silent installation, there may be no visible progress window. Wait until Command Prompt returns to the setup folder line.
You can also check Task Manager to see if Office setup processes are running in the background.
Troubleshooting: Wrong Product Installed
If the wrong Microsoft product is installed, check your configuration file carefully.
For Microsoft Visio Professional 2024 LTSC, the Product ID should be:
VisioPro2024Volume
If you use a different Product ID, the Office Deployment Tool may install another Microsoft product or fail to install the correct product.
Configuration File Explained
Here is what each important part of the configuration file means:
OfficeClientEdition="64"This tells the Office Deployment Tool to install the 64-bit version.
Channel="PerpetualVL2024"This tells the installer to use the 2024 perpetual volume license channel.
Product ID="VisioPro2024Volume"This tells the installer to install Microsoft Visio Professional 2024 Volume.
PIDKEY="XXXXX-XXXXX-XXXXX-XXXXX-XXXXX"This is where your product key goes.
Language ID="en-us"This installs the English United States language version.
RemoveMSIThis helps remove older MSI-based Office installations that may conflict with the new installation.
Display Level="None"This makes the installation run without a normal setup window.
AcceptEULA="TRUE"This accepts the license terms during installation.
AUTOACTIVATE Value="1"This tells the product to attempt automatic activation.
Recommended Folder Structure
For the easiest installation process, use this folder structure:
C:\Office2024Setup- setup.exe
- configuration.xml
Keeping both files in the same folder helps avoid command errors.
Common Mistakes to Avoid
Avoid these common installation mistakes:
- Using the wrong Product ID
- Saving the file as configuration.xml.txt
- Forgetting to replace the sample product key
- Running Command Prompt without administrator permission
- Typing the wrong folder path
- Closing Command Prompt before installation is complete
- Installing the wrong Visio edition
- Using a Visio Standard key for Visio Professional
- Using an Office key instead of a Visio key
- Trying to install on Mac or unsupported devices
Frequently Asked Questions
Can I install Visio Professional 2024 LTSC without the Office Deployment Tool?
For this installation method, the Office Deployment Tool is required. It allows you to install Visio Professional 2024 LTSC using a configuration.xml file.
What folder should I use?
This guide uses:
C:\Office2024SetupYou can use another folder, but using this path makes the commands easier to follow.
What should the configuration file be named?
The file should be named:
configuration.xmlMake sure it is not saved as configuration.xml.txt.
What Product ID should I use for Visio Professional 2024 LTSC?
Use this Product ID:
VisioPro2024Volume
Can I use this guide for Visio Standard 2024?
No. This guide is specifically for Microsoft Visio Professional 2024 LTSC. Visio Standard uses a different product configuration.
Can I use this guide for Office LTSC Pro Plus 2024?
No. Office LTSC Pro Plus 2024 uses a different Product ID. This guide is specifically for Visio Professional 2024 LTSC.
For the Office Pro Plus LTSC Installation Guide:
👉 Office Pro Plus 2019 LTSC Installation Guide
👉 Office Pro Plus 2021 LTSC Installation Guide
👉 Office Pro Plus 2024 LTSC Installation Guide
Is this guide for Windows or Mac?
This guide is for Windows PC only. It is not for Mac.
Why does the installation run without a window?
The configuration file uses silent installation with Display Level set to None. This means you may not see a traditional installer window.
What should I do after installation?
Open Visio from the Start menu, go to File > Account, and check the activation status.
Conclusion
Installing Microsoft Visio Professional 2024 LTSC with the Office Deployment Tool is a clean and reliable method when you use the correct configuration.xml file.
The most important steps are preparing the setup folder, extracting the Office Deployment Tool, creating the configuration.xml file with Product ID=”VisioPro2024Volume”, replacing the sample product key with your actual key, and running the setup command from Command Prompt as administrator.
After installation, open Visio and check your activation status from File > Account.
If you need a Microsoft Visio Professional 2024 LTSC product key, visit Digital Keys Depot and choose the correct Visio version, edition, activation method, and PC count before purchase.